SET UP YOUR OWN TV NETWORK on ROKU!
App Options & Features
The following core options and features are available in the Roku app by Strimm:
-
A stylish look of your entire TV network, featuring all your Roku channels on the app screen.
-
A TV guide below a preview screen, showing all your Roku channels with their daily program
-
Real-time broadcast according to your schedule on Strimm.
-
Capability to easily switch between channels.
-
Capability to add any channel to “Favorites”.
-
Capability to learn information about the future shows by simply clicking on them.
-
Search for the channels and currently broadcasting shows
-
Show your brand.
-
Monetization capability thru integrated Roku Advertisement Framework

Requirements To Get Started
-
A Roku device, connected to a TV device.
-
A Roku account: https://my.roku.com/signup
-
Enrollment in the Developer Program: https://developer.roku.com/enrollment/standard/ (Details: https://developer.roku.com/en-gb/docs/developer-program/getting-started/developer-setup.md )
-
An active Professional Plus Subscription on Strimm.com
-
An access to direct links of videos in .mp4 or .m3u8 (HLS) format on a server with a good CDN.
-
Advertisement on Roku: If you plan to show ads in the new Roku app, please complete the Roku Payments signup form here (requires login to your developer account first): https://developer.roku.com/payments/gettingStarted This is a required step for showing any ads on the Roku platform, even if you've done it for a previous app or if you're using your own/third-party ads (like VAST tags). Please note that Roku must approve this submission before the app is published.
Please note that the majority of the Roku installation steps below come directly from Roku and are linked to the related pages on roku.com. Please contact Roku support directly, if there are any questions related to their requirements and steps.
A. SETUP ON STRIMM
Before you start
-
Supported video formats: .m3u8 (HLS) or .mp4 formats, which can play in the embedded Strimm TV player on your website and in your Roku App. Videos should be hosted in your video streaming CDN server, like AWS, Bunny.net, DynoTube or another video streaming CDN service and linked directly to your channel, which is dedicated for Roku. Check www.strimm.us/steps instructions of how to connect direct/private video links from your server to the channel.
-
Many Roku devices do not support HEVC/H.265 codecs anymore. Avoid using video links encoded with this codec.
-
Vimeo, YouTube and Dailymotion videos are not applicable for the Roku channel. The application will show errors in case EPG contains these kinds of videos.
-
New Strimm channels can be added or removed to/from the Roku application. Open OTT settings and switch checkbox to include or exclude channel:
-
You do not need to re-publish a new Roku app to add one or more channels. Channels will appear in the published Roku app after adding them to Roku App in OTT settings (for Roku) of your Strimm account.
-
Vimeo, YouTube and Dailymotion videos are not supported in the Roku application. Do not use these videos for Roku channels.
Setup on Strimm.com
-
Make sure to have an active Professional Plus subscription on Strimm.com to activate a Roku app.
-
Create or select the first channel on Strimm that you want to add to Roku.
-
Allow your Strimm TV channel to be embedded on your website, even if you are not planning to add this channel to your site. If you do not have a website, place www.example.com in the URL/domain field, as a placeholder. The Roku App is an ADD-ON feature, which is directly connected to the website embedding settings. Please follow detailed instructions on the channel embedding setup here: www.strimm.us/steps and https://strimm.com/guides
-
Turn the “Allow Private videos” ON in the channel settings and click UPDATE To save it.
-
Add direct (“private”) links of the videos to the channel library for the broadcast on Roku.
-
Make sure that only videos in format are added. All links must be HTTPS.
-
Example: https://bitmovin-a.akamaihd.net/content/playhouse-vr/m3u8s/105560.m3u8
-
ATTENTION: Avoid having videos from YouTube or Dailymotion, or in any other video format in the channel except .mp4 or .m3u8 or Vimeo in order to generate broadcast on Roku thru the app.
-
Click on the "App Settings" link in the Production Studio of the channel that you want to add to your Roku app. Add the channel to the Roku app. You should add at least one channel to the Roku app to generate the Roku application.

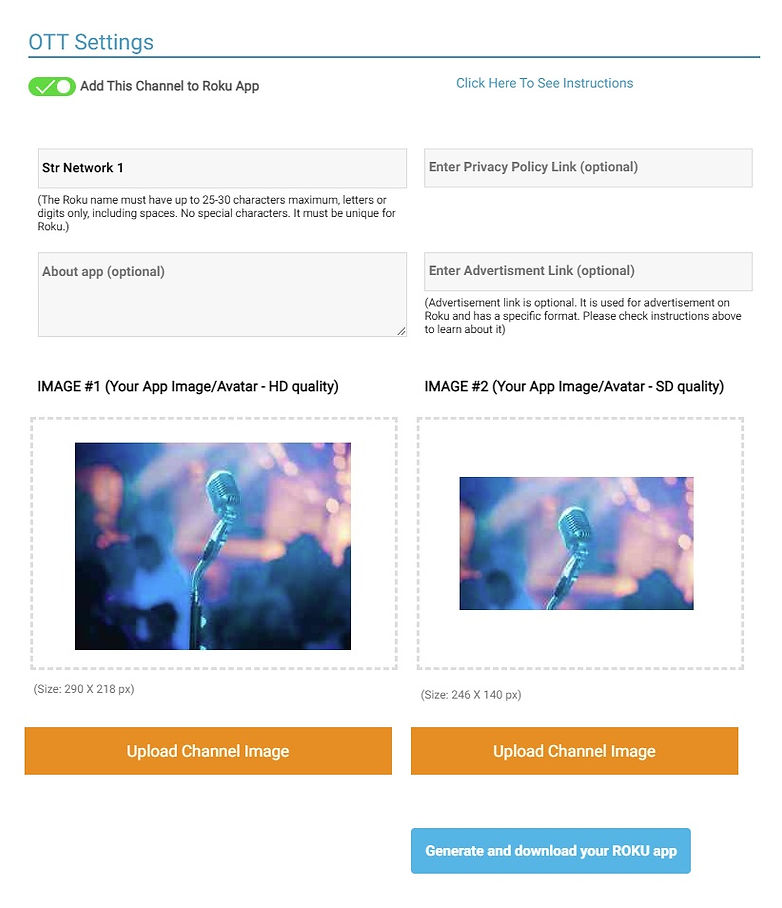
Complete all required fields in the Roku app settings form:
-
Roku app name (title) – It is your Roku App Title. Though it is called "Roku Channel" by Roku, it is your entire TV Network or Roku App and may have multiple channels inside. The applicable channels that you have in your Strimm account will appear there under their own names. This Roku App title has to be unique for the Roku Channel Store. If it is not unique, Roku may reject it. Make sure to publish the Roku channel first, to check the title availability and get back to this settings screen to update the Channel Title (Roku app name) if a previously selected name is not available.
-
Roku App icons – Upload two (2) app logo images with exact resolutions 290px X 218px and 246px X 140px. These images will identify your Roku Channel (Roku App) on Roku Home Screen. The above images must be in PNG format only.
Complete other fields (optional):
-
AD URL – It is a link to an ADVERTISEMENT server, for monetization. Go to the Advertising on Roku Channel chapter for details.
-
Privacy Policy URL – It is a link to your own Privacy Policy page. You can place a link to a Privacy Policy located on your website. If you do not have a website, then you can link to your own Privacy Policy located in Google Drive or Google Docs or Dropbox, or else. It is recommended to create a Privacy policy and place a link to it in that field.
-
About app - it is information about your app, your network, your company, and your brand. It will be Public to viewers of our Roku channels. They can see it when they click on the ABOUT button on the App screen. Please limit it to 500 characters.
-
Once done, download a ZIP file of the app. This zip file will be used for package generation and Roku Channel (App) creation in your Roku account.
Change an order of the channel in the TV GUIDE in the Roku app:
Channels in the Roku app guide will appear in sequence according to their creation date. You can also organize your channels in a custom order. Use a description field in the channel settings on Strimm.com and append a channel order number in the square brackets [ ] at the start or at the end of the channel description.
Channels will be ordered according to these numbers in the TV Guide in Roku. Channels without numbers will appear in the Roku app below numbered ones.
Example:
Placing [2] in the description field will place the channel in the #2 position in the Roku app.

B. SETUP ON ROKU
Requirements to get started on developing a channel:
A Roku device: https://roku.com/products/compare
A Roku account: https://my.roku.com/signup
Enrollment in the Developer Program: https://developer.roku.com/enrollment/standard/
We also suggest reviewing the Roku Development video course, to understand the core elements of Roku: https://developer.roku.com/en-gb/videos/courses/rsg/intro.md
Note: You can skip some steps if you have already done them before.
Roku app package is required for SDK publishing. Your Roku app zip file, which should be downloaded from the Roku app settings on Strimm.com is a part of it. Please make sure that all fields are completed properly in the form on Strimm.com before you download your Strimm Roku App zip file.
IMPORTANT: Please perform all steps below in the SAME browser, where you are logged in. You can operate in the different tubs, but the browser has to be the same. If you take a break, make sure that you are still logged in. Otherwise, the process may not go through properly.
1. Create a Roku Account
Create a Roku account if you don’t have one. Open this link - https://my.roku.com/signup in a web browser and follow the steps on the page.

Link your Roku device to this account. Open the following link in the web browser - Link your Roku device - and enter a link code from your Roku device screen. If you are linking an already linked device, then execute a “Factory Reset” on your device (Settings -> System -> Advanced system settings -> Factory Reset)
Complete the developer’s information such as a developer’s name displayed in the Channel Store, personal name, address, and other personal information by clicking on the Developer Information link.
The Payment Information page is used to enroll in the Roku Partner Payouts Program, which enables your account for remittances and payments. Before enrolling, you will need to have some financial information at hand, such as your bank account information. See Publisher Payouts for more information
2. Create Developer Environment
The next step is to create a Developer Environment on Roku (if you have it already, you can skip this part).
Please complete the following steps to create it: https://developer.roku.com/en-gb/docs/developer-program/getting-started/developer-setup.md

3. Packaging Roku Channel
Publishing a channel on the Roku Channel Store requires several items for the channel, such as its source code, images, and fonts, to be "packaged" into a bundle that gets encrypted.
For a step-by-step channel packaging walkthrough, please follow the following steps: https://developer.roku.com/en-gb/docs/developer-program/publishing/packaging-channels.md.
Note: since it is a single application, the “REKEYING” part at the end of the “Packaging” steps can be skipped.
Before a channel can be packaged, it must first be sideloaded onto a Roku device. Refer to Developer environment setup for how to sideload channels.

a) Sideloading Channel
Before a channel (a Roku App) can be packaged, it must first be "sideloaded" (installed) onto a Roku device.
-
Access the Development Application Installer in the web browser by placing an IP that appeared on your Roku TV screen during developer mode setup and log in with your chosen password in the browser. Please note that your IP may change from time to time. Please use the latest one to connect.
-
Once logged in, upload the Strimm Roku Zip File that was downloaded from your Strimm TV account.
-
Click “Install”
-
The channel will be "sideloaded" (installed). Do NOT close this browser window. You will need to come back to it shortly for the next step.
Note: if you are updating a previously installed app, then you need to "upload" a new Zip file and click "Replace"


b) Packager Key generation steps
Once you have the channel sideloaded onto a Roku device, you’ll need to generate a key to sign your package.
-
Open a telnet session (windows command).
If you do not have it, then it is suggested to download a PuTTY telnet app - https://www.chiark.greenend.org.uk/~sgtatham/putty/latest.html (Mac users – you can utilize Mac Telnet client or a similar application)
-
Add the latest IP address, acquired from the Roku TV screen like XX.X.X.XX, change the Port to 8080, select OTHER in the connection type, and chose TELNET in the dropdown.
-
Click OPEN
-
Type genkey and click ENTER. If you get a message "command not recognized", verify that the genkey command is entered correctly and repeat it.
-
A Dev Key will be generated. Store it in a secure place along with a generated password.
See screenshots below:


-
Go back to the browser window with a sideloaded channel.
-
Refresh that browser window with the sideloaded channel. The newly generated PACKAGER link should appear on the web page in the top right corner after the refresh. This link will open a page, where the final App package will be later uploaded.
-
If the PACKAGER link does not appear on the page with the sideloaded channel, then you may need to try to refresh the page one more time or start from the beginning of the “Packaging Roku Channel” procedure.
c) Packaging the sideloaded channel
-
Please complete Step 4 - " Packaging the sideloaded channel" in https://developer.roku.com/en-gb/docs/developer-program/publishing/packaging-channels.md
-
Once the package is created, click on the .pkg link and download the package. It is your latest Roku app package, which will be used shortly for the upload to Roku.
4. Enabling Deep Linking
Deep linking enables users to get to your content faster from the Roku UI via Roku's content discovery features (for example, Roku Search and Roku home screen banners). With deep linking, your channel is launched into playback or content springboards directly from the Roku UI. For example, when a movie is selected from Roku Search, playback starts immediately without any channel navigation. This functionality enables you to leverage Roku's content discovery features in order to drive users to your channel and increase engagement.
Details: https://developer.roku.com/docs/developer-program/discovery/implementing-deep-linking.md
To allow deep linking on Roku you would need two additional pieces of information: content ID and Media Type
a) Media type. Please select "Live" for media type.
b) Content Id. It is your Channel ID. It is located below your channel name in Production Studio. See an example below.

5. Publishing a Roku Channel
When procedures ## 2 & 3 above are completed, and you are ready to deploy your channel, you publish it through the Developer Dashboard on your Roku Developers account.
Notes:
a) The complete steps to publishing your SDK Channel can be found here: https://developer.roku.com/en-gb/docs/developer-program/publishing/channel-publishing-guide.md
b) Your Strimm Roku app is an SDK Channel. Though it is called “Channel” by Roku, it is your App. It can have multiple channels inside with the same name of each channel as they are called in your Strimm TV account. It is your own Roku TV Network. When you name your Roku SDK “Channel”, you actually create a name for your Roku Network (app) and not for a single channel.
c) The Roku platform supports both public and non-certified (private) SDK channels.
Public channel - published in the Channel Store and discoverable from the Search feature on the Roku home page.
Non-certified (private) channel - not in the Channel Store and used for testing or limited circulation. It can only be installed using the channel’s dedicated access code.

STEPS:
-
Go to your Roku developers account, to the Developer Dashboard
-
Click on "Manage My Channels" in the MY CHANNELS section.
-
Click "Add Channel" on the next screen
-
Next, select Developer SDK, Public (if the public is option is preferred), enter a Channel Name
-
Click CONTINUE
TIP: Do not include "Roku" or any profanity/derogatory language in the channel (app) name. It is not allowed.


-
Complete all fields in the opened "Properties" window and click SAVE:
- Channel Stores: Regions the channel will be available in
- Languages: Select all languages for which you would like to provide localized metadata information about your channel to appear in the Roku Channel Store. It is important to note that you must select the predominant language in a given country in order for customers in that country to be able to install your channel. In other words, if you are distributing your channel in the French Channel Store, you must select French as a support language; if your channel is available in Brazil, Portuguese must be selected as a supported language.
- Classification: Select the option that best describes the channel type
- Internet Connection Required: Yes/No
- Is your channel made for kids?: If your channel is made for kids you must select "Yes" and comply with the applicable children’s privacy laws and youth protection laws in the countries in which your channel is published. For more information, see Channels Made for Kids.
- CVAA Compliance: Yes/No
- Channel Age Rating: To provide parents with information to help them determine whether your channel is appropriate for their children, you must specify the age rating that best describes your channel overall. The four available options include "All Ages," "Content Rated — Parental Guidance Advised," "Content Not Rated — Parental - - Guidance Advised," and "Adult." Descriptions of each of these age ratings are provided on the Properties page.
- Customer Account Requirement: Indicate whether a customer account with your company is required for access to channel features.
- Your Privacy Policy URL: If required, supply the URL of your channel's privacy policy.
- Terms of Use: Provide a link to your channel's terms of use agreement.
- Vanity Access Code: Add a unique string of characters to make sharing the channel easier (example, https://my.roku.com/account/add/myrokuchannel). The Vanity access code is only available after a channel has been published.
Make sure to increment the channel’s major, minor, and build versions in the manifest as well as the Channel Version for each new package submitted.

-
Complete all the remaining steps shown here: https://developer.roku.com/en-gb/docs/developer-program/publishing/channel-publishing-guide.md and upload the .pkg package.
-
That is it. Your channel is now submitted for publishing. Congratulations! You should get notified by Roku (thru an email and in your Dashboard) if your SDK Channel is approved to go Public. It may take several days to review it by Roku.
-
If you selected a non-certified channel, you can watch it right away on your local Roku TV set, on your TV.
6. Advertising on Roku Channel
-
Your Strimm Roku application utilizes the native Roku Advertising Framework (RAF) for showing ads. RAF enables the seamless integration of video advertising into your channels. RAF is parsing of ads in VAST2, VAST3, VMAP, and FreeWheel's SmartXML formats.
-
To learn about RAF and to add advertisement to your app please follow the Roku Advertising Framework overview: https://developer.roku.com/en-gb/docs/developer-program/advertising/roku-advertising-framework.md

C. Troubleshooting Tips
a)There are no channels shown in my Roku app
-
Open your Strimm account and verify that at least one channel has been added to the Roku app and published.
-
Make sure that the channel is set for embedding on the website first, before adding the channel to the Roku app.
-
NOTE: You should have an active Professional Plus subscription plan to add channels to the Roku app.
b) There is no broadcast on some of the channels
Please make sure that you have a TV program being published for today, for the current time.
c) There is a different show broadcasting right now.
Please note that all shows broadcast per local time of the viewer, based on the location and the time settings of the Roku device. For example, if the show is scheduled at 7 pm in New York tomorrow, it will also be broadcasted tomorrow at 7 pm in Tokyo, at the local time. However, if the settings on the device in Tokyo are based on New York’s time, then it will broadcast at 7pm New York time.
d) Some shows are not broadcasting, or the schedule suddenly disappeared.
-
Please check your Roku app settings and the setting for embedding on the website on Strimm.com. Make sure that they are set properly, and nothing got disconnected or turned OFF.
-
Make sure that only .mp4 or .m3u8 videos are in the Strimm channel’s library.
Note: for all direct Roku SDK Channel setup and monetization-related questions please contact Roku support directly.
Enjoy your own linear TV network on Roku!
